
Latest News
PVC-Free Full-Colour Printed Window Graphics for Groves...
Our green-fingered friends at Groves Nurseries have expanded their external displays with these vibrant...


Ingenious mounting system that's designed to clip onto shell scheme walls. Very quick and easy fitting - no tools required. Maintains maximum stand space. No display equipment taking valuable exhibition space. Tru300 rollable media, or the recommended 3mm Rigid Foam PVC. Roll up into drums to transport and store (available as an optional extra).
Fantastic company - accurate - on time and great customer service! Highly recommended
- Bushra Mughal - BMI Health Care
The order arrived first thing this morning and having unpacked the display I can tell you it looks absolutely fantastic!...
- Nick Taylor - Piri Limited
An ingenious mounting system that is designed to clip onto shell scheme walls. If you have space at an exhibition with a pre-existing shell scheme, then our panels provide a perfect way to create a stunning background display. No tools are required. We print your desired display straight onto our high quality Tru300 rollable media, or the recommended 3mm Rigid Foam PVC, the result is a great-looking high-quality graphic equipped with velcro pads so that your display can attach straight onto your shell scheme.
Shell-Clad Panels are becoming increasingly popular due to their quick setup and easy-to-fit design. Panels simply attach to the existing shell scheme and sit side by side to create one seamless graphic, with no gaps. This works great for attracting new customers to your exhibition space and leaves you with the maximum stand space with no banner stands or pop-up displays taking valuable exhibition space. All our panels are compact and easy to transport.
There are two types of shell-clad adapters available, choosing the correct adapter is simple as they are colour-coded as BLACK or BLUE. If you have any queries about Shell Clad, our sales team will be happy to discuss any ambiguity with you. To purchase Shell Clad Fixings, please visit our dedicated page.
Shell Clad is designed to attach graphics and similar lightweight materials to a shell scheme. Do NOT attempt to hang heavy objects with Shell Clad.
Whether you’re a novice or a professional when it comes to artwork, we’re able to give you guidance or provide artwork templates for you to make sure your product is print perfect.
For further information, please read our Artwork Preparation guide, or contact us here with your artwork questions. Alternatively, give us a call on 01297 630130.
Why not use our in-house Graphic Design Team to help you make the most out of your Shell Scheme Graphics 4m x 3m?
Our designers will work with you to create a professional design to your exact specifications. You can be as involved in the design process as you want to be, either working side by side with our designers or giving them your design brief. We will provide you with an artwork proof for you to approve and will never send your artwork to print without your final sign-off.
Unlike some other companies, we want to offer value for money, so we ensure that you are only charged for the actual time taken to create your design (minimum 15-minute intervals). Formatting a quick layout or checking over print-ready files may be free of charge. If more work is needed, we will contact you to discuss this.
Use our video guide to see how easy it is to set up the Shell Scheme with Shell Clad Fixings. You can also download our PDF user instructions below. For any support needs, please don't hesitate to contact us.
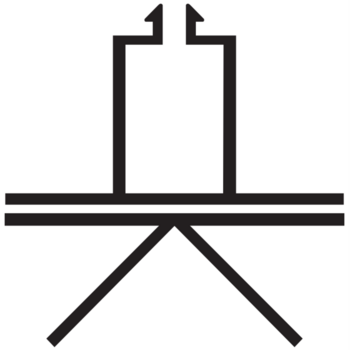
SHELL CLAD CLIP FIXINGS
This comes in two sizes which are colour-coded black and blue for differentiation. The difference concerns the width of the locking grooves into which the clips fit. These Shell-Clad clips fit the following shell schemes:-
COMPATABILITY - BLACK
Burkhart Leitner, Crea8, Maima M1000, Maxima, Meroform, Normex, Octanorm, Pion (no locking facility), Quad 4, R8, Syma 408, and all Octanorm derivatives
COMPATABILITY - BLUE
Agem, Aluset, Click (using an adaptor), Ford+Barley, Modul, Nimlock, Nomadic Design Line, Sodem, Syma Molto (30/90) and Unibox
There are bound to be other shell scheme systems that we do fit but have not yet come into contact with. If in doubt, please contact us on 01297 630130.
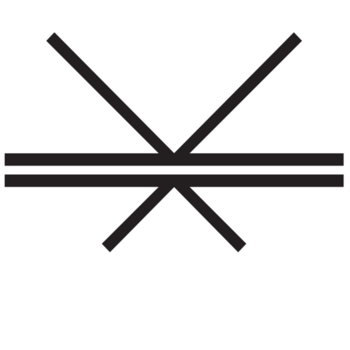
STANDARD SHELL CLAD CLIP
This comes in two sizes which are colour-coded black and blue for differentiation. The difference concerns the width of the locking grooves into which the clips fit.
STANDARD SHELL CLAD CORNER
This is best attached to the standard Shell Clip using two sided-tape. It fits both black and blue chips.
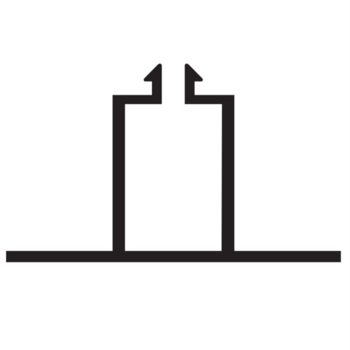
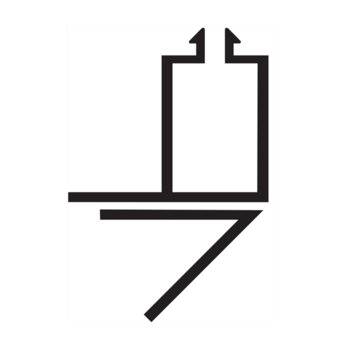
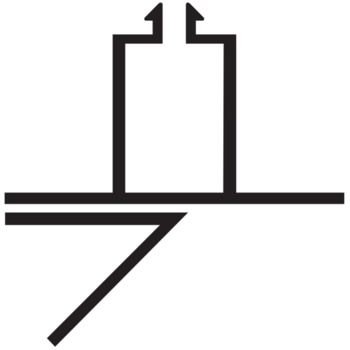
SHELL CLAD SHORT END
To create a short end (see below for use), take a standard clip (1) and score down the outside of a 'wing' using a sharp blade (carefully). After 3-4 scores, the "wing" will snap off cleanly as shown.
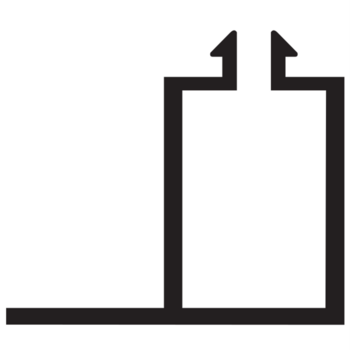
SHELL CLAD EXTERNAL CORNER
Apply two half corners (4) to a standard clip (1) in an arrow head format as shown to achieve an external corner.
SHELL CLAD INTERNAL CORNERS
Apply two-sided tape to the flat face of a standard corner piece (2) and then attach to a standard clip (1) as shown to achieve an internal corner.

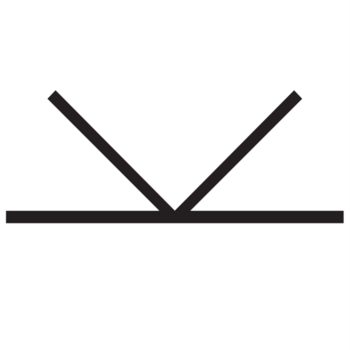
SHELL CLAD HALF CORNERS
To create a half corner, take a standard corner and lay it face down on a cutting board. Using a sharp blade (carefully), score along the V groove of the corner unit 3-4 times. Then snap the corner unit in half to obtain two half corners as shown. (If you apply two-sided tape to the flat surface before you start scoring, your two corners will be conveniently pre-taped).
SHELL CLAD NON-RETURN CORNER
This fixing is used when you are cladding the back wall of a shell scheme that has side walls that do not require cladding. Take half corner (4) to a short end (3) in such a way that the two cut edges align, as shown. You now have a non-return corner as shown.
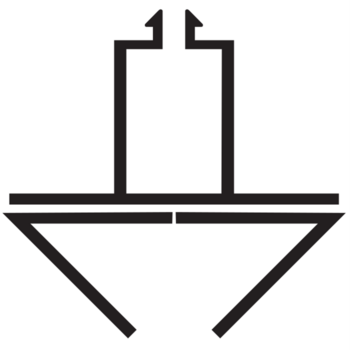
SHELL CLAD DIAGONAL CORNER
This fixing is used when you are cladding diagonally across a corner, for example if you want to place a self standing flat screen or whatever in a corner with a cut out in your diagonal panel so that the screen is flush with the panel. Attach a half corner (4) to a standard clip (1) as shown. You now have a diagonal corner (145 degrees).
All corners described so far are for fixing to traditional octagonal shell scheme poles/pillars, ie those with diagonal grooves for fixing.
Every now and again you will come across square pillars (Maxima, ford + Barley, some Unibox, Quad 4 etc).
The following describes how we make corners for these pillars (also suitable for circular pillars)

SHELL CLAD SMALL SQUARE CORNER FIXING
If the sides of your shell scheme pillars are less than 60mm, you will need to trim down the V of one of the two corner units (2). This involves scoring and snapping off Xmm from each side of one V so that it will fit flush with the corner of the square pillar. The length of "X" is dependent on the size of the pillar.
SHELL CLAD LARGE SQUARE CORNER FIXING
Take two standard corner units (2) and attach them flat surface to flat surface. You now have a corner that will hold graphics in position against a large square pillar. Please note, this will be a "floating" corner in that it won't be fixed to the shell scheme.


Our green-fingered friends at Groves Nurseries have expanded their external displays with these vibrant...
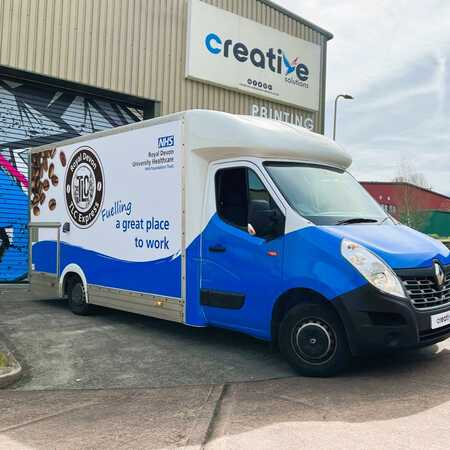
Recently, we had the privilege of partnering with Royal Devon University Healthcare in collaboration...

Producing and installing bus graphics for Beaminster Town Council is more than just a project; it's...
Subscribe to our newsletter and you'll be first to hear about our latest special offers, products and recent work.


